1. INTRODUCTION
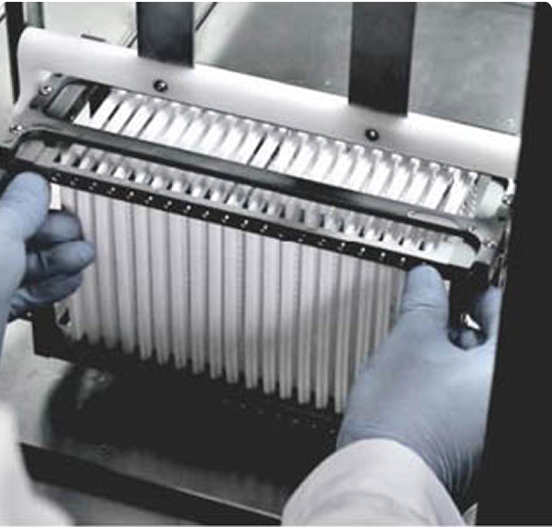
The Turbo Grinder is a high-throughput tissue grinder designed for efficient homogenisation of a wide variety of biological and environmental samples. It is ideal for processing plant tissues (roots, stems, leaves), seeds, animal tissues (muscles, fur, bones), bacteria, fungi, and more. By applying intense mechanical shear force, the Turbo Grinder breaks down and disperses samples into individual cells or small fragments
This system uses stainless steel, high-density glass, or zirconia beads as grinding media, enabling rapid and effective pulverisation. Capable of processing up to 576 samples (6 x 96 deep-well plates) simultaneously, it dramatically increases efficiency and throughput in workflows such as nucleic acid extraction from large samples sets.
The working area features a high-frequency vibrating vertical plate, which drives the sample tubes in a powerful two-dimensional motion. This action causes the grinding media inside the tubes to move irregularly and with force, delivering high-frequency impacts and compression. The result is rapid, even sample disruption and homogenisation.

2. INSTALLATION REQUIREMENTS
The Turbo Grinder must be installed and operated indoors under the following environmental conditions:
- Operating Temperature: 10 ˚C – 30 ˚C
- Relative Humidity: ≤ 70%
- Power Supply Voltage: 110 V AC – 240 V AC; 50 Hz / 60 Hz
The working environment should be free from:
- Conductive dust
- Explosive or corrosive gases
- Strong electromagnetic interference.
The packing list for the Turbo Grinder is as follows:
| Item No. | Item Name | Additional Information | Unit Type | Quantity |
| 1 | High-throughput Tissue Grinder | Turbo Grinder | Instrument | 1 |
| 2 | Steel Balls | 2 mm | Bottle | 1 |
| 3 | Steel Beads | 5 mm | Bottle | 1 |
| 4 | Deep-Well Plate | 2.0 mL | Plate | 1 |
| 5 | Silicone Cap | Compatible with 2.0 mL Deep-Well Plates | Piece | 6 |
| 6 | 96-well Positioning Plate | Piece | 2 | |
| 7 | Product Certificate | 1 | ||
| 8 | User Guide | 1 | ||
| 9 | Quick Start Guide | 1 |
3. TURBO GRINDER PARAMETERS
| Time Setting | 0 – 9999 seconds |
| Frequency Setting | 0 – 70 Hz |
| Rated Power | 800 W |
| Fixture Stroke | 32 mm (vertical) |
| Adapter Specifications | Suitable for 6 x 96-deep well plates |
| Instrument Dimensions | 510 mm; 560 mm; 590 mm (Length x Width x Height) |
| Instrument Weight | 65 Kg |
SOFTWARE APPLICATION FUNCTIONS
The Turbo Grinder’s software menu allows users to configure various operational parameters, including grinding frequency, grinding time, number of cycles, and delay time. Up to 20 grinding programs can be stored for quick recall and consistency:
Available Settings:
1. Grinding Frequency. Adjustable between 0-70 Hz.
2. Grinding Time. Adjustable between 0-9999s.
Note: This device is designed for short-term, intermittent operation. For extended grinding, it is recommended to set up a multi-cycle grinding program with short durations
3. Grinding Cycles. Users can set the desired number of grinding cycles based on experimental requirements to ensure optimal sample processing.
4. Interruption Time. Configure the delay time between cycles to allow the instrument and samples to cool. This helps prevent overheating and potential damage to the device or sample material. A pause
can also help the sample to settle before repeating.
4. TURNING ON THE TURBO GRINDER
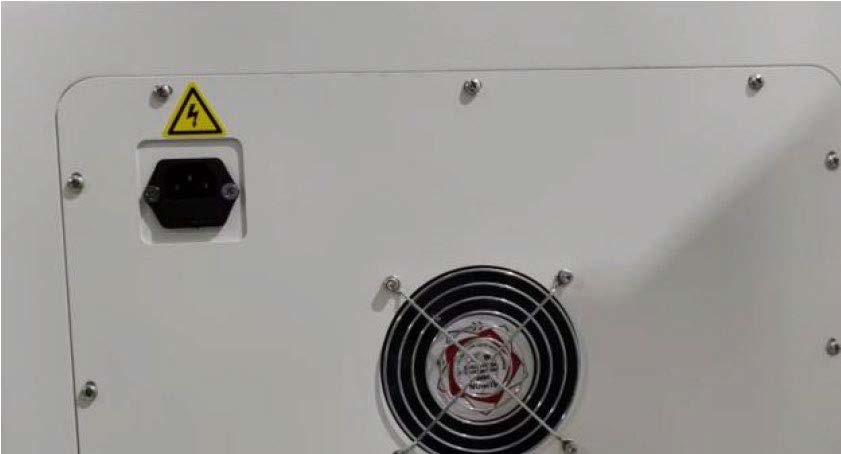
The power cord plug is located at the rear of the instrument. Connect one end of the power cord to the plug
and the other end to a suitable power source.
The power button is located on the right-hand side of the instrument. Before powering on, ensure the
experimental chamber is free of any foreign objects.
Press the power button firmly. Once powered on, the instrument will perform a self-check. If the self-check completes successfully, the system will proceed to the startup menu.
5. OPERATING THE TURBO GRINDER
1. INSTRUMENT OPERATION
1.1 Sample Preparation
Cut samples into small pieces and place them in 2.0 mL deep-well plates or microfuge tubes. Add two 4 mm steel balls or zirconia beads to each well as grinding media.
Select a processing method according to your experimental needs:
- Dry Grinding – Suitable for dry leaf tissue. Cover the plate and grind directly on the machine
- Wet Grinding – Add lysis buffer or other sample treatment solutions before covering and grinding.
- Freeze Grinding – Freeze the deep-well plate in liquid nitrogen before grinding.
1.2 Sample Installation and Fixation
The Turbo Grinder offers two sample mounting methods: Quick Release and Conventional Release.
A. Quick Release
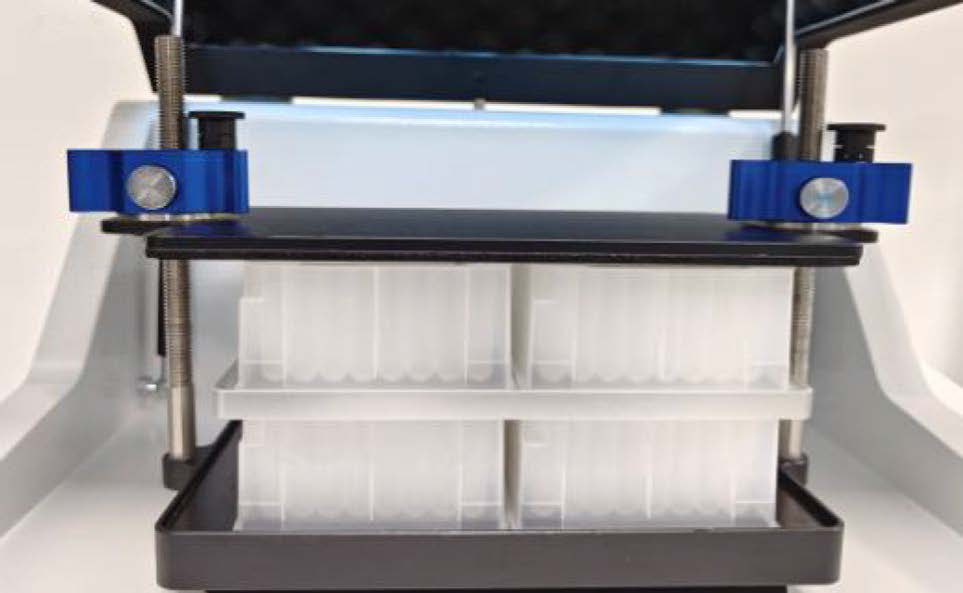
The Quick Release method is suitable for up to 4 deep well plates only.
Figure 2 shows the working area (vertical plate) of the Turbo Grinder, including the quick release nuts,
adapter cover, and adapter base. Ensure samples are properly secured before starting the grinding process.
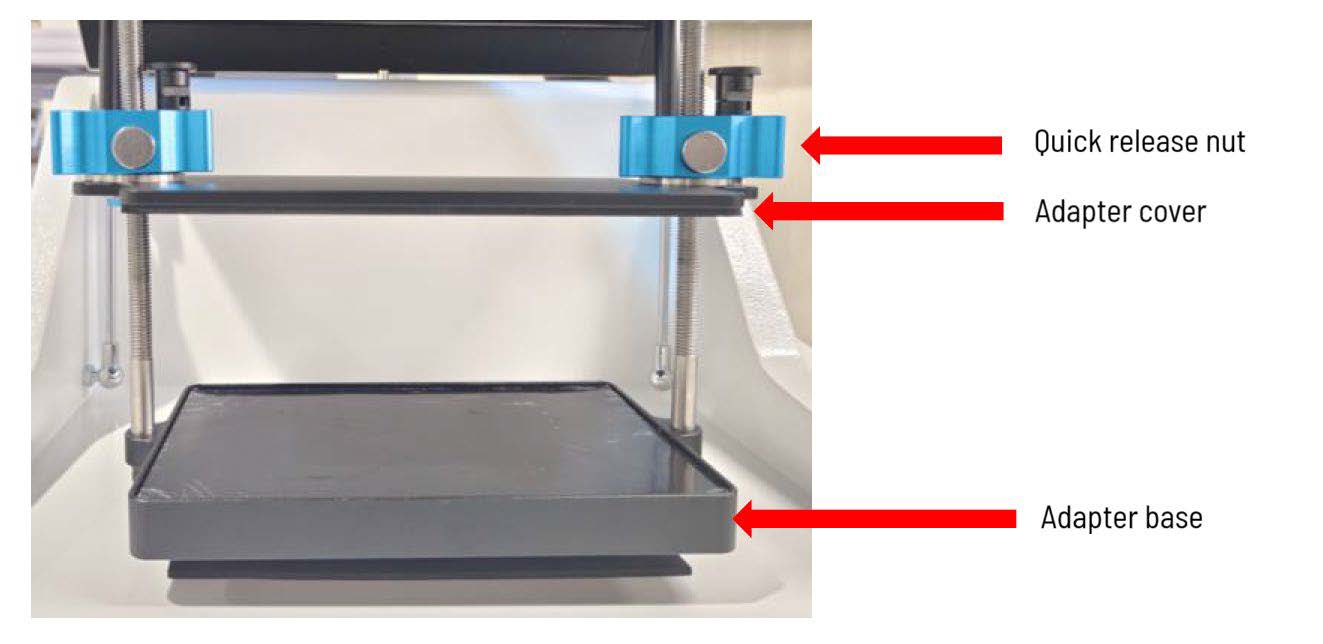
1. Unlock the adapter’s anti-release plunger on the fastening (Figure 3). Press both quick-release buttons on the fastening nuts simultaneously to remove the adapter cover.
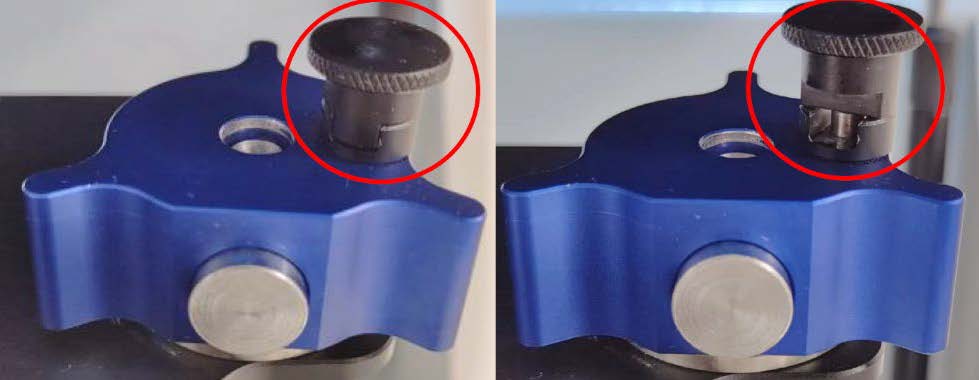
2. Place the prepared deep-well plate flat on the adapter in the swing arm (Figure 4). Position it centrally. If grinding only one single-slot deep-well plate, insert an empty plate on the opposite side to maintain balance. Press both quick-release buttons to position the adapter cover, then rotate the locking nut to tighten. Move the anti-release plunger to the locked position.
Note: If the plunger does not lock securely, gently rotate the locking nut left or right to adjust.
3. After grinding, repeat Step 1 to remove the samples.
B. Conventional Release
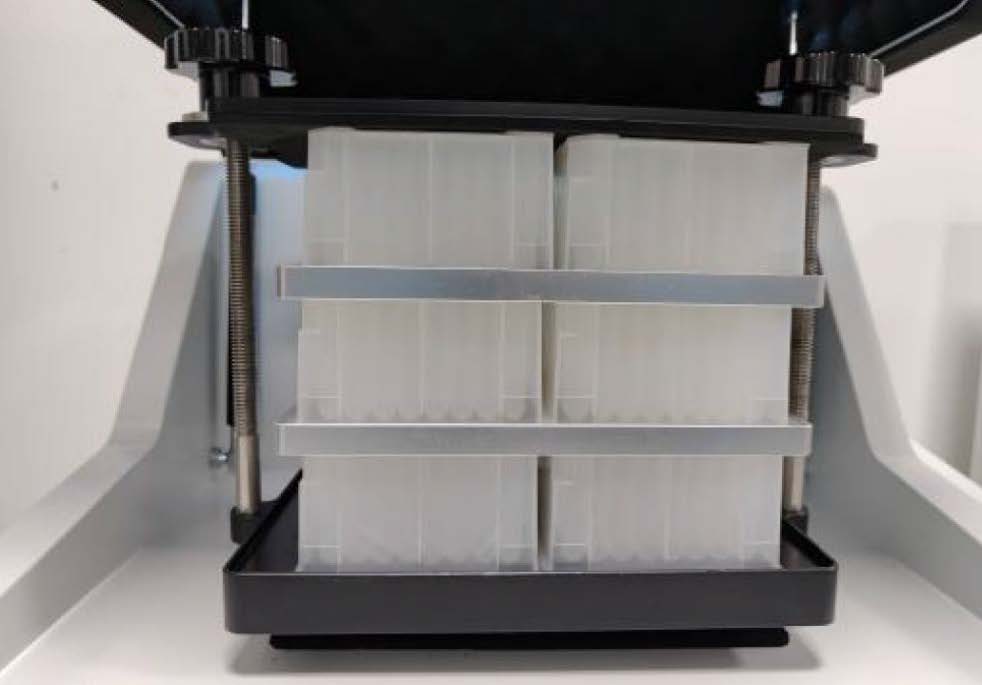
The Conventional Release method is suitable for 1-6 deep-well plates. For more than 4 plates, this method must be used.
1. Rotate the full-thread fastening nuts counterclockwise to remove the adapter cover plate.
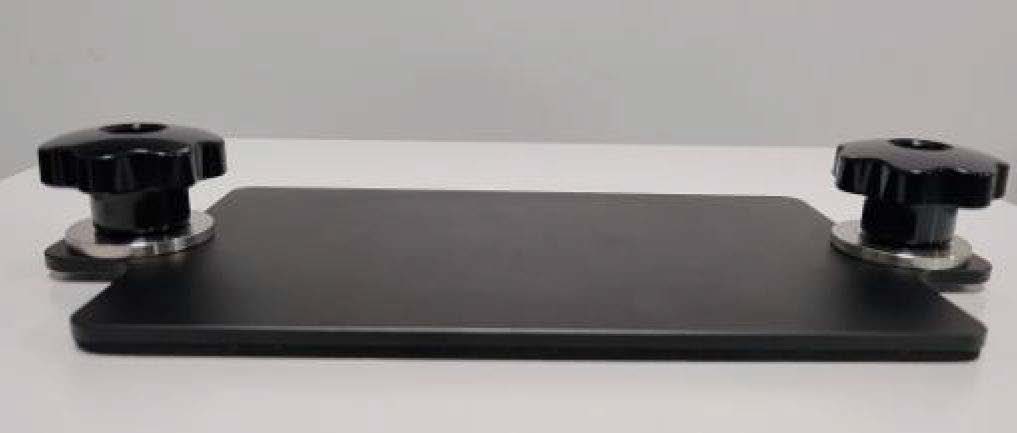
2. Place the prepared deep-well plates flat on the adapter in the swing arm (Figure 6). Position it centrally. If using only one single-slot deep-well plate, insert an empty plate opposite it to maintain balance. Position the cover plate, then rotate both nuts clockwise evenly with both hands until the cover plate securely holds the deep-well plate in place.
Note: Both the cover plate and adapter must remain balanced. Tighten both nuts evenly before proceeding.
3. After grinding, repeat Step 1 to remove the samples.
2. SOFTWARE OPERATION
2.1 Startup Menu
After powering on, the Turbo Grinder will display the Startup Menu. The system supports both Chinese and English. Select your preferred language to enter the main home screen.
2.2 Main Menu
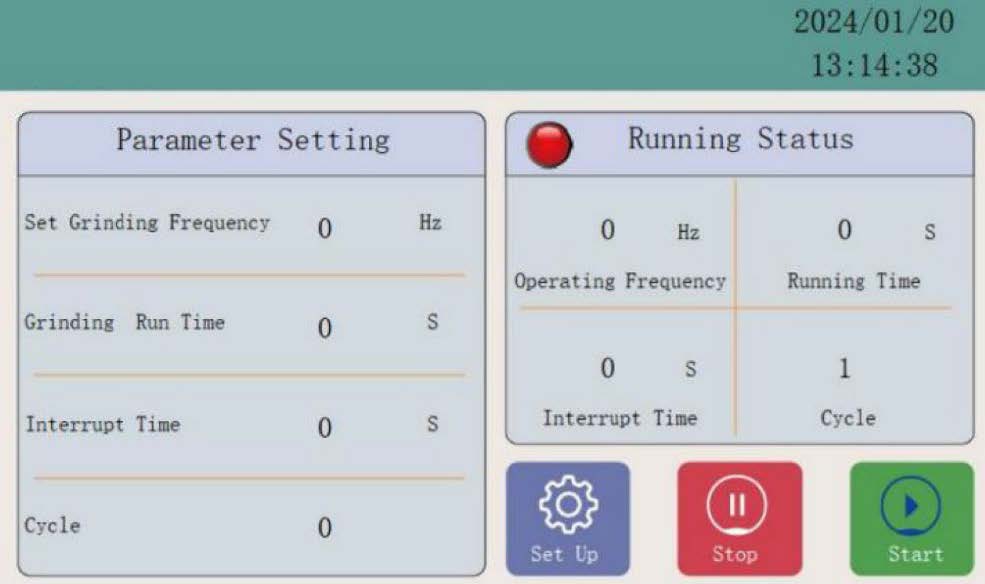
The Main Menu (Figure 7) displays two sections: Parameter Setting and Running Status.
- Parameter Setting – View and edit the grinding program parameters.
- Running Status – Monitor the current operations. Below Running Status there are three control buttons: Set Up, Stop, and Start.
2.3 Program Settings
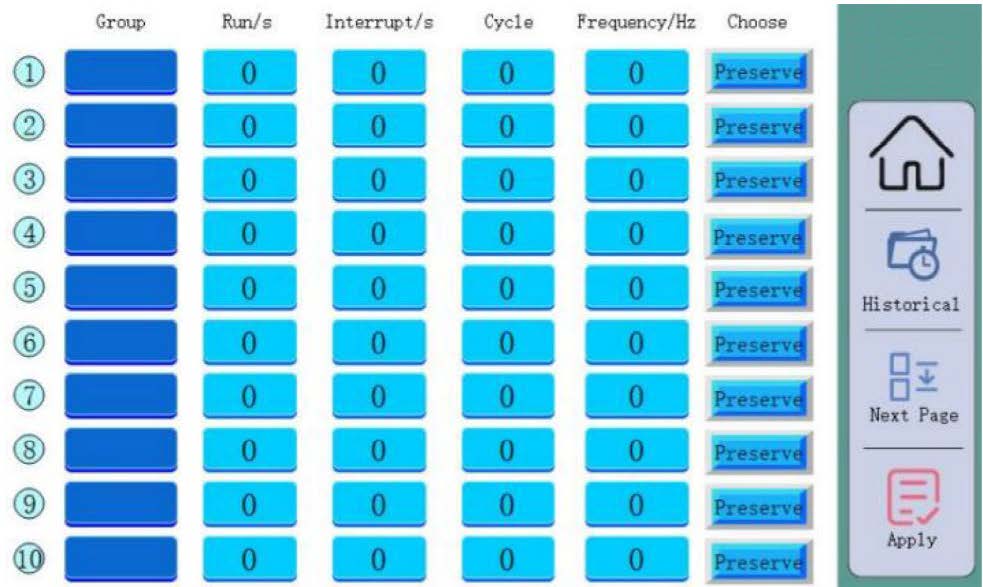
Click Set Up on the main interface to open the program list editing menu (Figure 8).
From here you can:
- Adjust the grinding frequency
- Set the run time
- Define the number of grinding cycles
- Set the delay time between cycles
- Review running history data
To set parameters:
- Tap the numeric keys to enter your values.
- Click Preserve to save the settings and select the program.
- Click Apply to load the program.
- Press the Home button to return to the main menu.
- After confirming all parameters, press Start to begin grinding.
Note: The Preserve button serves two functions – it both saves a new program and selects for its use.
6. INSTRUMENT CARE AND SAFE OPERATION
GENERAL CARE AND MAINTENANCE
The Turbo Grinder is built for dependable performance and long service life. Following these simple care and
safety guidelines will help keep it operating at its best:
- Always ensure the adapter is balanced on both sides before starting a run. For even wear and optimal
grinding, avoid single-sided operation. - The Turbo Grinder is designed for short-term, intermittent operation. For extended grinding, use
programmed cycles with delay intervals. - To clean, simply wipe with a slightly damp cloth. Avoid rinsing the instrument directly with water, as
this can damage the precision components inside. - If something doesn’t seem right during operation, pause the run and turn off the power before
investigating further. If needed, contact trained service personnel. - Place the instrument on a stable, level laboratory bench or floor (stone surfaces are ideal) to minimize
vibration during grinding. - Keep the machine in a stopped state when not in use, and perform a quick check of the chamber,
adapter, and covers before starting.
TROUBLESHOOTING
The Turbo Grinder is designed for reliable, long-term operation. Under normal conditions, it will perform consistently and efficiently. However, as with all precision instruments, certain operational checks can help ensure optimal performance and avoid interruptions. Below are practical tips and quick checks you can perform if something doesn’t seem to be running as expected.
1) Machine starts immediately after power-on
- Check if the startup button mode is set to Start. If so, press Stop to begin operation manually.
- Ensure the safety switch at the cover opening is not accidentally pressed. If the black rubber cap is compressed, leave the cover open for it to return to its normal position.
2) Machine does not begin after pressing Start
- Check if the time counter displays 0; if it is 0, set the time.
- Check if the displayed frequency is below 30Hz; if not, adjust the dial to increase the frequency.
3) Loud knocking sound during operation
- Confirm that the bottom transport fixing nut has been removed before use.
- Ensure the adapter anti-release plunger is in the correct position.
4) Screen displays “Communicating” after power-on
- Check that the data cable at the back of the display is firmly connected.
5) Adapter or pressure cover movement feels unstable
- Inspect the adapter fixing screws for wear. If needed, contact support for a replacement.
6) Screen does not turn on despite the power switch being on
- Ensure the display connector is secure. If loose, contact after-sales service
7) No response after extended storage or during normal operation
- The self-protection function may have activated to prevent damage. Contact support to check and replace the fuse if required.
8) Adapter main shaft is loose or damaged
- Contact the 3CR service team for professional maintenance.
7. ORDERING INFORMATION
For ordering details, please visit www.3crbio.com.
8. SUPPORT
If you require any support with the use of the Turbo Grinder or other 3CR Bioscience products
and services, please contact our Technical Support team on support@3crbio.com.
9. WARRANTY
Information on warranty conditions will be detailed in the sales contract. For further details, please contact your 3CR Bioscience sales representative. Any unauthorised modifications to this instrument will void the warranty and maintenance contract.
7. SOFTWARE LICENSE AGREEMENT
The control program and application program of Turbo Grinder have been installed in the tablet control computer at the factory, and the Licensee will bear all the responsibilities and obligations caused by choosing to use the software, completing the established goals, installation and subsequent use, and the software is protected by copyright.
(1) Grant of Software License
The Supplier grants the Licensee a non-exclusive, one-time use license to use the Software subject to the terms and conditions of this Agreement, provided that the Licensee agrees to continue to abide by all the terms below. The Licensee may: Use the software on one workstation at a time, which shall be owned by Licensee in any form. The software is transferred by assigning the rights of this agreement to other parties, but the other parties should agree to accept the terms and conditions of this agreement in writing and inform HCSCI. In addition, the Licensee must ensure that copyright notices remain on transferred software. The Licensee may not use the software on multiple workstations. Copy, sell, or otherwise transfer the software or assign its rights under this agreement in whole or in part, except as expressly provided in this agreement. lease, distribute, license or sublicense the software. Create derivative software based on the software. modify, adapt, transform, reverse engineer, decompile or disassemble the software.
The Supplier reserves all rights not expressly granted herein, including, but not limited to, the right to sell
the software directly or through affiliates, distributors or third parties.
(2) Limited Warranty
The Software is provided “as is” without warranty of any kind, either express or implied, including, but not limited to, the implied warranties of merchantability and fitness for a particular purpose. If the software proves to be defective, the Licensee assumes the entire risk as to the quality and performance of the software. The Licensee assumes the cost of all necessary servicing, repair or modification of the software.
However, the Supplier warrants that the equipment on which the Software is equipped will be free from defects in material and workmanship for a period of 90 days of normal use from the date of delivery indicated on your copy of the receipt.
(3) Disclaimer
The warranties set forth in the preceding paragraph are in lieu of all other warranties, express or implied, made by law during performance, dealing, business use or otherwise. The Supplier and any entity controlling, controlled by, or under common control with the Supplier (“Supplier’s Affiliates”) specifically disclaim all warranties, express or implied, including, but not limited to, the following implied warranties of merchantability, witness for a particular purpose, and non-infringement, in any form. The Supplier and Supplier’s Affiliates make no representations or warranties regarding the software or the results that the Licensee or any third party will obtain from the software. The Licensee acknowledges that it has not requested any representations or warranties from the Supplier or Supplier’s affiliates other than those specifically and expressly set forth in this Agreement.
(4) Limitation of Compensation
The Supplier’s sole responsibility, and the Licensee’s sole remedy, shall be to return to the Supplier any Program Media that does not conform to the Supplier’s Limited Warranty, along with a copy of the Licensee’s receipt, and to replace such Program Media. If the Supplier cannot replace without charge the program media free from defects in material and workmanship, the Licensee may terminate this Agreement by returning the software and a copy of the Licensee’s receipt to Supplier to Supplier, and Licensee’s payment
will be returned.
In no event shall the Supplier or any of its affiliates be liable for special, indirect incidental, and consequential
damages (including without limitation, losses, loss of data or information, loss of software functionality, business interruption, damage to business goodwill or reputation, or downtime costs), even if the Supplier or its affiliates have been advised of the possibility of such damages and notwithstanding any malfunction of critical functions. The Supplier and its affiliates (and their respective officers, employees, consultants, lawyers, and agents) shall be jointly liable for all losses arising from any cause and form of behaviour related to this agreement, or the software liability shall be limited to, at the Supplier’s sole discretion, replacement of the software or refund of monies received by the Supplier or its affiliates from the Licensee in connection with the software.
(5) Basic Information
Except as expressly provided in this Agreement, the Licensee shall not sublicense, assign, or transfer the entire License or Software. Any other practice of sublicensing, assigning or transferring any rights, duties or obligations under this Agreement shall be avoided.
(6) Intellectual Property Rights
The Licensee shall own only the rights to the Software as expressly set forth in this Agreement. Any other rights associated with the Software, including, but not limited to, proprietary and patent rights, copyrights, trademarks, trade secrets, and other intellectual property rights, shall be the exclusive property of the Supplier. The Licensee may not remove from the Software any reference to copyright, trademark or other proprietary rights, or overwrite or alter any reference to such information. The Licensee shall take all reasonable steps to prevent any unauthorized use, copying, sale or publication of the Software or any practice of providing access to the Software without authorization. The Licensee shall indemnify and hold the Supplier harmless from and against any losses, damages, claims and expenses (including, without limitation, reasonable legal fees) relating to any infringement by the Supplier arising out of any breach by the Licensee, the Licensee’s breach of this Agreement, or the Licensee’s use of the Software in a manner not authorized by this Agreement.
(7) Duration and Termination
This Agreement will remain in effect until terminated. If the Licensee fails to comply with any of the terms and conditions of this Agreement, this Agreement will terminate automatically without notice from the Supplier. In the event of termination negotiated between the Licensee and the Supplier, the Licensee shall destroy the Software. Regardless of how this Agreement is terminated, all rights to use the Software owned by the Licensee shall expire.
(8) Other Matters
If any provision of this manual is declared invalid or unenforceable by a court of competent jurisdiction, the remaining provisions will continue in full force and effect. The Supplier’s failure to exercise any of its rights under this Agreement shall not be deemed a waiver of its rights, including, but not limited to, its right to respond to future violations. By opening and using the Software the Licensee acknowledges that it has read and understood this Agreement and agrees to abide by the terms and conditions of this Agreement. The Licensee further agrees that this Agreement is the complete and exclusive statement of the agreement between the Licensee and the Supplier and supersedes any proposal or previous agreement, oral or written, and any other communication between the Licensee and Supplier relating to the subject matter of this Agreement. The headings of the several sections of this Agreement are for reference only and shall not be made a part of this Agreement or affect the meaning or interpretation of this agreement.
(9) Applicable Law and Place of Jurisdiction
This Agreement and all Orders resulting therefrom shall be governed by English Law. All disputes resulting from and relating to this Agreement which cannot be settled amicably shall be submitted to the competent court of law in England. The Vienna Sales Convention and the United Nations Convention on Contracts for the International Sale of Goods shall not apply to this Agreement.
11. LEGAL INFORMATION
| Version | Based on Software Version | Based on Device Model | Date |
| 1.0 | V1.0.0 | Turbo Grinder 5760 | Nov 2024 |
The information in this manual cannot be changed without notice. Without the express written consent of 3CR Bioscience, all contents of this manual shall not be reproduced or disseminated in any form or by any method (including electronic and mechanical means) for any purpose.
Questions and suggestions about this manual can be directed to the address below or to your representative of 3CR Bioscience Limited (Hereinafter referred to as “3CR Bio”), official distributor of this software.
Company Address: Unit 10 West Point Business Park, West Road, Harlow, Essex CM20 2BU, United Kingdom.
Tel: +44 (0)1279 940 983
Website: www.3crbio.com
3CR Bioscience Ltd. has made every effort to ensure that the content of the Turbo Grinder User Guide is correct when copied. However, 3CR Bioscience maintains the right to make necessary modifications without notice to conform to the development of its products.
©2025 3CR Bioscience Ltd. All rights reserved. Intended for molecular biology applications. This product is not intended for the diagnosis, prevention or treatment of a disease.